概要
軽くクラスタリングをする用事があったので、scikit-learnで記述した。
それをサンプルコードに落としたものを貼っておく。
@CretedDate 2014/09/28
@Versions Python2.7.6 NumPy1.9.2 scikit-learn0.16.1
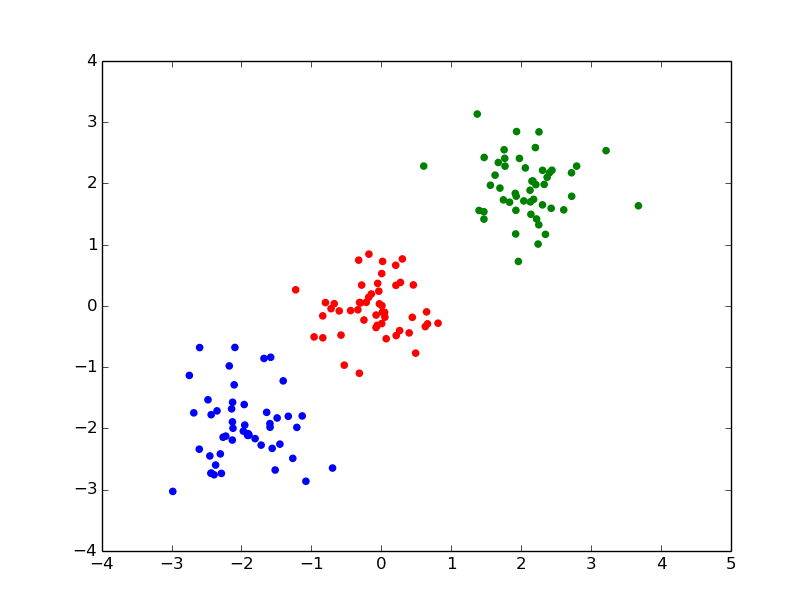
テストデータの生成
位置をずらしつつrandomでデータを生成してみる。
import numpy as np
import pylab as pl
from sklearn.cluster import KMeans

# 傾向の違う3つの点を描画
n0 = np.random.normal(loc=0.0, scale=0.5, size=(50, 2))
n1 = np.random.normal(loc=-2.0, scale=0.5, size=(50, 2))
n2 = np.random.normal(loc=2.0, scale=0.5, size=(50, 2))

# plotして確認
pl.scatter( n0[:, 0], n0[:, 1] )
pl.scatter( n1[:, 0], n1[:, 1] )
pl.scatter( n2[:, 0], n2[:, 1] )
pl.show()
実行するとこんな感じ。

クラスタリングする
上記のデータをクラスタリングしてみる。
import numpy as np
import pylab as pl
from sklearn.cluster import KMeans

# 傾向の違う3つの点を描画
n0 = np.random.normal(loc=0.0, scale=0.5, size=(50, 2))
n1 = np.random.normal(loc=-2.0, scale=0.5, size=(50, 2))
n2 = np.random.normal(loc=2.0, scale=0.5, size=(50, 2))

# 統合してclustering
nx = np.concatenate( (n0, n1, n2), axis=0 )
k_means = KMeans(n_clusters=3, n_init=10)
k_means.fit( nx )
fitした後にk_means.labels_の値を見てみると、下記のようになる。
In [112]: k_means.labels_
Out[112]:
array([1, 1, 1, 1, 1, 1, 1, 1, 1, 1, 1, 1, 1, 1, 1, 1, 1, 1, 1, 1, 1, 1, 1,
       1, 1, 1, 1, 1, 1, 1, 1, 1, 1, 1, 1, 1, 1, 1, 1, 1, 1, 1, 1, 1, 1, 1,
       1, 1, 1, 1, 0, 0, 0, 0, 0, 0, 0, 0, 0, 0, 0, 0, 0, 0, 0, 0, 0, 0, 0,
       0, 0, 0, 0, 0, 0, 0, 0, 0, 0, 0, 0, 0, 0, 0, 0, 0, 0, 0, 0, 0, 0, 0,
       0, 0, 0, 0, 0, 0, 0, 0, 2, 2, 2, 2, 2, 2, 2, 2, 2, 2, 2, 2, 2, 2, 2,
       2, 2, 2, 2, 2, 2, 2, 2, 2, 2, 2, 2, 2, 2, 2, 2, 2, 2, 2, 2, 2, 2, 2,
       2, 2, 2, 2, 2, 2, 2, 2, 2, 2, 2, 2], dtype=int32)
クラスタの値が入っている。3つに分類されていることがわかる。
各クラスタを色分けしてplotしてみる。
# 結果のplot
nx0 = nx[ k_means.labels_ == 0 ]
nx1 = nx[ k_means.labels_ == 1 ]
nx2 = nx[ k_means.labels_ == 2 ]
pl.scatter( nx0[:, 0], nx0[:, 1], color='red' )
pl.scatter( nx1[:, 0], nx1[:, 1], color='green' )
pl.scatter( nx2[:, 0], nx2[:, 1], color='blue' )
pl.show()
KMeansに渡せる引数
公式サイトの説明によると、指定できる引数は下記。
class sklearn.cluster.KMeans(n_clusters=8, init='k-means++', n_init=10, max_iter=300, tol=0.0001, precompute_distances='auto', verbose=0, random_state=None, copy_x=True, n_jobs=1)[source]
n_clustersはクラスタ数。今回は3で指定していた。これを5にするとこんな感じになる。
initはk-means++とrandomが指定できる。デフォルトはk-means++。あえてrandomを指定するケースは少ないと思われる。
max_iterは反復階数。デフォルトは300で収束しない場合は少なくすれば処理時間が減るはず。
n_jobsは並列実行の設定。-1でCPUのコア数と同数。-2でコア数-1。1でシングルスレッド。2だと2並列。
verboseを設定すると、fitする際に処理の詳細を出力する。
KMeansのfit後に取れる値
labels_が取れるのは先ほど実演した通り。
In [112]: k_means.labels_
Out[112]:
array([1, 1, 1, 1, 1, 1, 1, 1, 1, 1, 1, 1, 1, 1, 1, 1, 1, 1, 1, 1, 1, 1, 1,
       1, 1, 1, 1, 1, 1, 1, 1, 1, 1, 1, 1, 1, 1, 1, 1, 1, 1, 1, 1, 1, 1, 1,
       1, 1, 1, 1, 0, 0, 0, 0, 0, 0, 0, 0, 0, 0, 0, 0, 0, 0, 0, 0, 0, 0, 0,
       0, 0, 0, 0, 0, 0, 0, 0, 0, 0, 0, 0, 0, 0, 0, 0, 0, 0, 0, 0, 0, 0, 0,
       0, 0, 0, 0, 0, 0, 0, 0, 2, 2, 2, 2, 2, 2, 2, 2, 2, 2, 2, 2, 2, 2, 2,
       2, 2, 2, 2, 2, 2, 2, 2, 2, 2, 2, 2, 2, 2, 2, 2, 2, 2, 2, 2, 2, 2, 2,
       2, 2, 2, 2, 2, 2, 2, 2, 2, 2, 2, 2], dtype=int32)
cluster_centers_で重心の一覧が取れる。
IN[139]: k_means.cluster_centers_
Out[139]:
array([[-1.97402016, -1.89511434],
       [ 1.99805448,  1.98608351],
       [ 0.03775627, -0.12351613]])
テストデータ的には[-2, -2], [2, 2], [0, 0]が重心に来るようなrandomの出力をしたので、概ねそれっぽい値が出ていることがわかる。