FlaskとElasticsearchとPandasを使った簡易なWebアプリ
概要
PythonとElasticsearchを連携させてPandasに入れて、Scipyに食わせて分析結果を返すような簡易アプリケーションが必要になったので、フレームワークにFlask、ストレージにElasticsearchを利用して作ってみる。
本資料は導入から簡易なアプリケーションを作成するまでの手順をメモしたもの。
@Versions flask 0.11.1, elasticsearch 2.4.3
Flaskの導入
Pythonは3系が入っている前提で話を進める。
FlaskはBottleあたりと比較される軽量なフレームワーク。Bottleは1枚っぺらのPythonファイルで実行できるポータビリティが売りだけど、対するFlaskはWerkzeugやJinja2などの既存ライブラリの組み合わせで成り立っている。
Jinja2はAnsibleとかでも使われているのでわりと馴染みがある。
Flaskのインストールはpipで行う。
$ pip install Flask Flask-WTF
Flask-WTFは今回作る単純なコードでは利用しないけど、Form使う時とか何かと必要になってくるので一緒に入れておく。
さっそくWebアプリケーションを作ってみる。
$ mkdir flask_example
$ cd flask_example
$ touch hello.py
作ったhello.pyにこんな記述をする。
from flask import Flask
app = Flask(__name__)

@app.route('/')
def hello():
  return 'hello'

if __name__ == '__main__':
  app.run(debug=True)
サーバを立ち上げる。
$ python hello.py
http://localhost:5000/にリクエストしてhelloと表示されたら成功。
デフォルトだと内側からしか見れないので、外から見たい場合は下記のように0.0.0.0を指定。
if __name__ == '__main__':
  app.run(debug=True, host="0.0.0.0")
Elasticsearchの導入
Java8が入っている前提。
Pure Javaのソフトウェアだしaptとかで入れることもなかろうということで、公式サイトからZipを頂戴して動かす。
バージョンは5系だとこれを書いてる現在はプラグインとかの兼ね合いで面倒事が増えるので、その前の2.4.3(バージョンが飛ぶからわかりづらい)を落とす。
解凍したらとりあえず叩いてみる。
$ cd elasticsearch-2.4.3
$ bin/elasticsearch
あとはelasticsearch-head(indexの状態とかを見られるプラグイン)とか、elasticsearch-analysis-kuromoji-neologd(形態素解析辞書拡張版)を入れておく。
$ bin/plugin install mobz/elasticsearch-head
$ bin/plugin install org.codelibs/elasticsearch-analysis-kuromoji-neologd/2.4.1
今回はPythonから扱う前提なので、pipでelasticsearchのクライアントを入れておく。
$ pip install elasticsearch
ざくっとシンプルなコードでElasticsearchへの投入と検索をやってみる。
Project GutenbergのTop100あたりから適当に文書を落としてきて入れてみる。
例文用にproject gutenbergから下記10タイトルを落としてきて、gutenbergというフォルダの中に入れておく。
http://www.gutenberg.org/cache/epub/46/pg46.txt
https://www.gutenberg.org/files/1342/1342-0.txt
https://www.gutenberg.org/files/53763/53763-0.txt
http://www.gutenberg.org/cache/epub/1661/pg1661.txt
https://www.gutenberg.org/files/53766/53766-0.txt
https://www.gutenberg.org/files/11/11-0.txt
https://www.gutenberg.org/files/98/98-0.txt
http://www.gutenberg.org/cache/epub/5200/pg5200.txt
https://www.gutenberg.org/files/53758/53758-0.txt
http://www.gutenberg.org/cache/epub/1232/pg1232.txt
elasticsearchが起動している状態で下記スクリプトを実行する。
import os
from elasticsearch import Elasticsearch

dirname = "gutenberg"

es = Elasticsearch()

# ダウンロードしたテキストファイルを適当にパースしてelastic searchに入れる
for id, fname in enumerate(os.listdir(dirname)):
  # TitleとかAuthorを判別しながらファイルを読み込む
  text, title, author = '', '', ''
  with open(os.path.join(dirname, fname), 'rt') as f:
    header = True
    for line in f:
      if not header:
        text += line
      elif line.startswith('*** START OF THIS PROJEC'):
        header = False
      elif line.startswith('Title:'):
        title = line.split(':')[1].strip()
      elif line.startswith('Author:'):
        author = line.split(':')[1].strip()
  # Elasticsearchに投入
  doc = { 'text': text, 'title': title, 'author': author, 'file_name': fname }
  es.index(index='gutenberg_books', doc_type='gutenberg', id=id+1, body=doc)
検索してみる。
# 登録したデータからaliceを含むタイトルを検索してみる
res = es.search(index='gutenberg_books', body={'_source': ['title', 'author'], 'query': {'match': {'text':'alice'}}})
for doc in res['hits']['hits']:
  print(doc['_source'])
    #=> {'author': 'Lewis Carroll', 'title': 'Alice’s Adventures in Wonderland'}
    #=> {'author': 'Arthur Conan Doyle', 'title': 'The Adventures of Sherlock Holmes'}
不思議の国のアリスは当然引っかかるとして、シャーロック・ホームズの冒険も引っかかった。
これでデータの投入、検索が一通り動くことは確認できた。
elasticsearch-headを入れているので、http://localhost:9200/_plugin/head/にリクエストすると内容が確認しやすいかもしれない。
日本語文書の投入
日本語文書も投入してみる。青空文庫のアクセスランキングあたりから適当に10件ほど文書を頂戴して、aozoraというフォルダに放り込んでおく。
青空文庫のテキストファイルはshift_jisなのでutfにするために下記のコマンドを打っておく。
$ nkf -w --overwrite *
Kuromojiのpluginがちゃんと入っているか確認しておく。http://localhost:9200/_nodes/pluginsを見ると、インストールされたプラグインの一覧が見れる。
今回はkuromoji-neologdとcjkの2種類のAnalyzerでそれぞれ本文を登録する。タイトルと著者名は気分的にcjkにしておく。
from elasticsearch import Elasticsearch

es = Elasticsearch()
mapping = '''
{
  "mappings": {
    "aozora": {
      "properties": {
        "title": {
          "type": "string",
          "analyzer": "cjk"
        },
        "author": {
          "type": "string",
          "analyzer": "cjk"
        },
        "text_kuromoji": {
          "type": "string",
          "analyzer": "kuromoji_neologd"
        },
        "text_cjk": {
          "type": "string",
          "analyzer": "cjk"
        }
      }
    }
  }
}
'''
es.indices.create(index='aozora', body=mapping)
indexを作り直したい時は下記でざっくり削除できる。
es.indices.delete(index='aozora')
これで青空文庫のテキストを投入してみる。
import os
from elasticsearch import Elasticsearch

dirname = "aozora"

es = Elasticsearch()

# ダウンロードしたテキストファイルを適当にパースしてelastic searchに入れる
for id, fname in enumerate(os.listdir(dirname)):
  # パース周り
  text, title, author = '', '', ''
  with open(os.path.join(dirname, fname), 'rt') as f:
    for row_num, line in enumerate(f):
      if row_num > 2:
        text += line
      elif row_num == 0:
        title = line.strip()
      elif row_num == 1:
        author = line.strip()
  # 投入
  doc = { 'text_kuromoji': text, 'text_cjk': text, 'title': title, 'author': author }
  es.index(index='aozora', doc_type='aozora', id=id+1, body=doc)
flaskで検索フォーム
ブラウザから検索を実行できるようにしたいので、Flaskで検索フォームを作ってみる。
まずはフォームに入力した値をそのままブラウザに表示するところまでやっておく。
下記のテンプレートをtemplates/hello.htmlという名前で保存する。helloという名前のテキストボックスだけがある味気のないフォーム。
<form action="{{ url_for('hello') }}">
  検索文字列:
  <input type="text" name="hello", value="{{ hello }}">
  <input type="submit" value="検索">
</form>

{{ hello }}
次に上の
from flask import Flask, render_template, url_for, request

app = Flask(__name__)

@app.route('/')
def hello():
  hello_field = request.args.get('hello')
  return render_template('hello.html', hello=hello_field)
検索結果をpandasに入れつつブラウザ表示
検索周りの準備はできたので、ブラウザからelasticsearchを検索してみます。
検索フォームに入力された文字列でelasticsearchからテキストを検索し、pandasに入れてto_htmlで画面に結果を表示してみる。
まずはPython側のコードから。検索結果をdictionaryにしてpandasで読み込ませている。
from flask import Flask, render_template, url_for, request
from elasticsearch import Elasticsearch
import pandas as pd

app = Flask(__name__)
es = Elasticsearch()

@app.route('/')
def search():
  word = request.args.get('word')
  if word is None:
    word = ''
  else:
    search_body = {'_source': ['title', 'author'], 'size': 1000, 'query': {'match': {'text_kuromoji':word}}}
    res = es.search(index='aozora', body=search_body)
    hits = [dict(list(doc['_source'].items()) + [('score', doc['_score'])]) for doc in res['hits']['hits']]
    df = pd.DataFrame(hits)

  return render_template('search.html', word=word, search_result=df.to_html(classes='books'))

if __name__ == '__main__':
  app.run(debug=True)
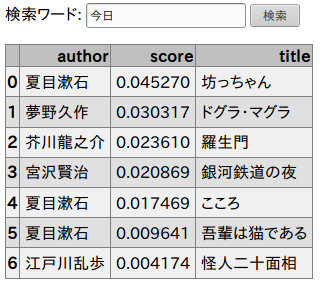
あとはdf.to_htmlした値をそのまま表示するだけ。上でhtml上のtableのclassにbooksという値を設定したので、少し見やすくなるように適当にcssも設定している。
<form action="{{ url_for('search') }}">
  検索ワード:
  <input type="text" name="word", value="{{ word }}">
  <input type="submit" value="検索">
</form>

<style type='text/css'>
table.books {border-collapse: collapse;}
table.books td { padding: 5px }
table.books > thead > tr { background-color: #c0c0c0 }
table.books > tbody > tr:nth-child(even) { background-color: #e0e0e0 }
table.books > tbody > tr:nth-child(odd) { background-color: #f0f0f0 }
</style>

<p>{{ search_result|safe }}
これで下記スクリーンショットのように検索結果が表示される。
感想
上記のような処理でDataFrameにしたあたりにいろいろ処理を書き込んでデモ的なものを作ってみたのだけど、利用者のリテラシーが保証されているならJupyterのが楽でいいよねというのが感想。
今回は利用者がわからなかったので、こじんまりとしたコードで済ませる方法を考えたところ、こんな構成になった。多分、もっといい選択肢があるはず。